Next.js
Deploy Next.js applications with automatic build optimization, server-side rendering, and API routes on Hostess.
Overview
The nextjs service type is designed for Next.js applications — the React framework for full-stack web development. When you set type: nextjs, Hostess automatically configures sensible defaults for port, health checks, and resource allocation, so you can get up and running with minimal configuration.
services:
  frontend:
    type: nextjs
    build:
      source: ./frontend
That is the simplest possible Next.js service. Hostess takes care of the rest.
Defaults
When you use type: nextjs, Hostess applies the following defaults:
| Setting | Default Value |
|---|---|
| Port | 3000 |
| Health check | GET / |
| Resources | medium (1 CPU, 1Gi memory) |
| Replicas | 1 |
You can override any of these in your hostess.yml configuration.
Build Setup
Don't want to write a Dockerfile? Use source and Hostess auto-detects and builds your Next.js app for you — no Dockerfile or standalone config needed. The Dockerfile setup below is for when you want full control over the build.
Next.js applications on Hostess run from the Docker image built for your service. The recommended setup uses standalone output mode, which produces a compact Node.js server that is easy to copy into a small runtime image.
Recommended Standalone Output
If you use the Dockerfile below, add output: 'standalone' to your next.config.ts (or next.config.js):
import type { NextConfig } from 'next';

const nextConfig: NextConfig = {
  output: 'standalone',
};

export default nextConfig;/** @type {import('next').NextConfig} */
const nextConfig = {
output: 'standalone',
};
module.exports = nextConfig;Keep your Next.js config and Dockerfile aligned. The recommended Dockerfile copies .next/standalone, so it expects standalone output to be enabled.
Dockerfile
You need a Dockerfile in your Next.js project directory. Here is a recommended multi-stage Dockerfile for Next.js:
FROM node:20-alpine AS base

# Install dependencies
FROM base AS deps
WORKDIR /app
COPY package.json package-lock.json* yarn.lock* pnpm-lock.yaml* ./
RUN \
  if [ -f yarn.lock ]; then yarn install --frozen-lockfile; \
  elif [ -f package-lock.json ]; then npm ci; \
  elif [ -f pnpm-lock.yaml ]; then corepack enable pnpm && pnpm install --frozen-lockfile; \
  else echo "No lockfile found." && exit 1; \
  fi

# Build the application
FROM base AS builder
WORKDIR /app
COPY --from=deps /app/node_modules ./node_modules
COPY . .
RUN \
  if [ -f yarn.lock ]; then yarn build; \
  elif [ -f package-lock.json ]; then npm run build; \
  elif [ -f pnpm-lock.yaml ]; then corepack enable pnpm && pnpm build; \
  else npm run build; \
  fi

# Production image
FROM base AS runner
WORKDIR /app
ENV NODE_ENV=production

RUN addgroup --system --gid 1001 nodejs
RUN adduser --system --uid 1001 nextjs

COPY --from=builder /app/public ./public
COPY --from=builder --chown=nextjs:nodejs /app/.next/standalone ./
COPY --from=builder --chown=nextjs:nodejs /app/.next/static ./.next/static

USER nextjs
EXPOSE 3000
ENV PORT=3000
ENV HOSTNAME="0.0.0.0"
CMD ["node", "server.js"]
This Dockerfile:
- Uses multi-stage builds to keep the final image small
- Copies only the standalone output (not the full
node_modules) - Runs as a non-root user for security
- Exposes port 3000
Environment Variables
Hostess injects values from the env block when your application runs. That is ideal for server-side Next.js code: Server Components, Route Handlers, API routes, middleware, and server-only helpers.
Runtime Server Variables
services:
  frontend:
    type: nextjs
    build:
      source: ./frontend
    env:
      DATABASE_URL: ${database.url}
      API_SECRET: ${secret:API_SECRET}
      API_URL: ${api.url}
      DEPLOYMENT_ENVIRONMENT: ${deployment.environment}
Use runtime variables for database connections, secret keys, deployment metadata, and internal service-to-service communication.
Browser-Visible Values
Variables prefixed with NEXT_PUBLIC_ are embedded into the JavaScript bundle at build time and are accessible in browser-side code. They are public — anyone viewing your site can see them.
Values in env are available at application runtime. For browser-visible constants that must be baked into the JavaScript bundle, pass literal build arguments and wire them through your Dockerfile with ARG / ENV before npm run build, pnpm build, or yarn build.
${secret:...} and magic variables are resolved for runtime env. build.args are passed to Docker as literal strings, so use only public literal values there.
services:
  frontend:
    type: nextjs
    build:
      source: ./frontend
      args:
        NEXT_PUBLIC_APP_ENV: production
        NEXT_PUBLIC_POSTHOG_KEY: phc_public_project_key
    env:
      API_URL: ${api.url}
      DATABASE_URL: ${database.url}
      JWT_SECRET: ${secret:JWT_SECRET}
      DEPLOYMENT_ENVIRONMENT: ${deployment.environment}
    depends_on:
      - api
- databaseARG NEXT_PUBLIC_APP_ENV
ARG NEXT_PUBLIC_POSTHOG_KEY
ENV NEXT_PUBLIC_APP_ENV=$NEXT_PUBLIC_APP_ENV
ENV NEXT_PUBLIC_POSTHOG_KEY=$NEXT_PUBLIC_POSTHOG_KEY
RUN pnpm buildConnecting to Other Services
A Next.js application frequently needs to communicate with backend services and databases. Prefer server-side calls for internal services, and expose browser-facing routes through your Next.js app when the browser does not need to know the backend URL.
Always prefer ${service.url} over ${service.external_url} for server-side calls. Internal URLs route traffic within the Hostess deployment — lower latency, no TLS overhead, and no public exposure of your backend services.
Server-Side Rendering (SSR)
When your Next.js server-side code (Server Components, Route Handlers, getServerSideProps) needs to call another service, use the internal URL. This keeps traffic inside the Hostess network for lower latency and avoids TLS overhead:
services:
  frontend:
    type: nextjs
    build:
      source: ./frontend
    env:
      # SSR calls the API over the internal network
      API_URL: ${api.url}
    depends_on:
      - api

  api:
    type: fastapi
    build:
      source: ./backend
In your Next.js code:
async function getProducts() {
  const res = await fetch(`${process.env.API_URL}/products`);
  return res.json();
}

export default async function HomePage() {
  const products = await getProducts();
  return <ProductList products={products} />;
}
Client-Side (Browser) — Recommended
When browser JavaScript needs to trigger backend work, route it through a Next.js Route Handler. The handler runs on the server and uses the internal Hostess URL — the browser never needs to know where your backend lives:
This is the recommended pattern for client-side calls on Hostess. Your Next.js app acts as a proxy layer: clients call /api/..., and the Route Handler forwards to ${api.url} internally. No NEXT_PUBLIC_* variables, no public backend exposure.
services:
  frontend:
    type: nextjs
    build:
      source: ./frontend
    env:
      API_URL: ${api.url}
    depends_on:
      - api
Route Handler:
import { NextResponse } from 'next/server';

export async function POST(request: Request) {
  const body = await request.json();
  const res = await fetch(`${process.env.API_URL}/orders`, {
    method: 'POST',
    headers: { 'Content-Type': 'application/json' },
    body: JSON.stringify(body),
  });

  return NextResponse.json(await res.json(), { status: res.status });
}
Client component:
'use client';

export function CreateOrder() {
  const handleSubmit = async (data: FormData) => {
    const res = await fetch('/api/orders', {
      method: 'POST',
      body: JSON.stringify(data),
    });
    // ...
  };

  return <form onSubmit={handleSubmit}>{/* ... */}</form>;
}
Browser Calls to Public APIs — Last Resort
Avoid this pattern when possible. It exposes your backend publicly and requires hardcoding a URL at build time, which means a full rebuild any time that URL changes. Prefer the Route Handler proxy pattern above.
If your browser code must call a backend service directly (for example, a third-party API that requires browser-side requests), give that backend a custom domain and bake the public URL into the Next.js bundle as a literal build argument:
services:
  frontend:
    type: nextjs
    build:
      source: ./frontend
      args:
        NEXT_PUBLIC_API_URL: https://api.myapp.com
    env:
      API_URL: ${api.url}
    depends_on:
      - api

  api:
    type: fastapi
    build:
      source: ./backend
    domains:
      - api.myapp.com
API Insights
Every Next.js service that takes traffic through a public Hostess URL gets request volume, latency, and error-rate charts on its Metrics tab in Studio — no code, no configuration. For route-level server detail and distributed traces, add the Hostess Next.js helper.
Install
npm install @hostess/nextjsRegister instrumentation
Next.js loads server-side instrumentation from a single instrumentation.ts (or .js) file at the root of your project (or under src/). Re-export Hostess's register and onRequestError from it:
export { register, onRequestError } from "@hostess/nextjs/server";If you already have an instrumentation.ts, call into the Hostess hooks from your own:
import { register as hostessRegister, onRequestError as hostessOnRequestError } from "@hostess/nextjs/server";

export async function register() {
  await hostessRegister();
  // your own instrumentation...
}

export const onRequestError = hostessOnRequestError;
That's the whole integration. The helper preconfigures OpenTelemetry instrumentation and points it at Hostess automatically — you don't set any OTLP endpoints or environment variables yourself. Hostess injects everything the helper needs at deploy time.
What you get
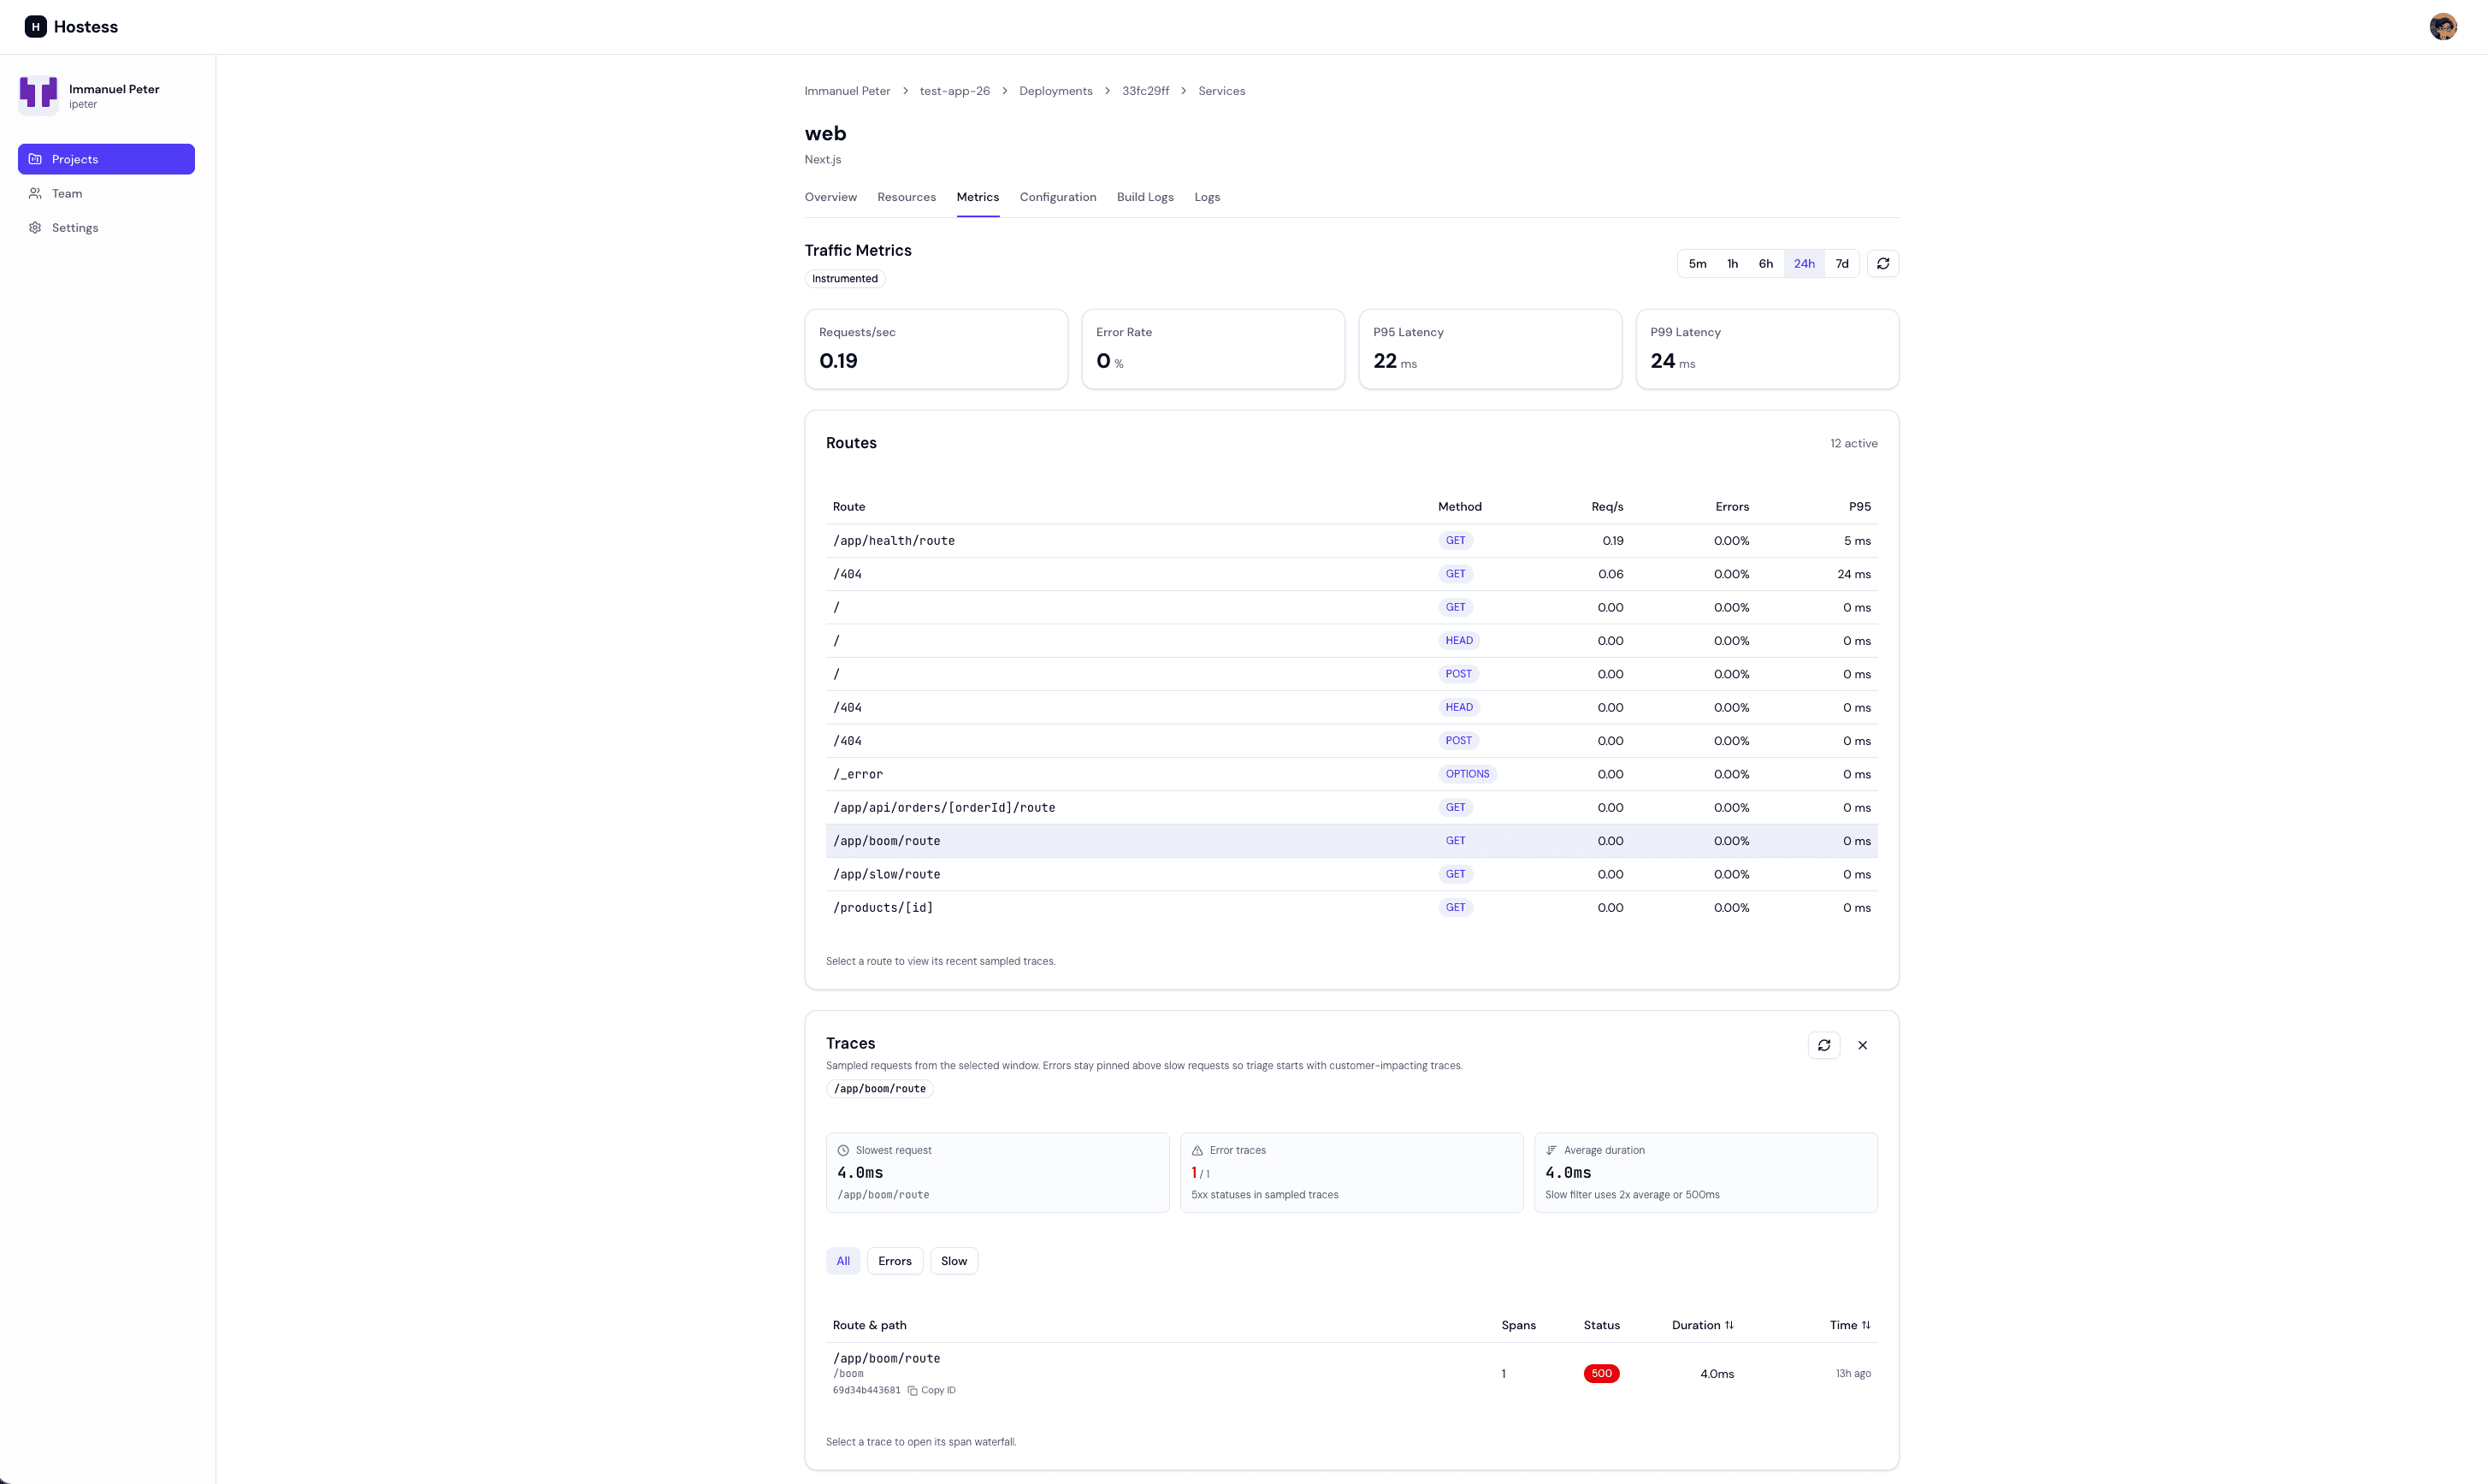
Once the helper is deployed and taking traffic, the Metrics tab unlocks:
- Per-route traffic, latency, and status codes — broken down by route instead of one aggregate line.
- Framework version — the exact Next.js version the running service reports.
- Distributed traces — click a route to see recent sampled traces, then open one as a waterfall. Traces follow requests across services, so a call from this frontend into a FastAPI backend appears as one trace. See Insights → Traces.
Turning it off
Insights are on by default. To disable collection for a service, set insights: disabled:
services:
  frontend:
    type: nextjs
    build:
      source: ./frontend
    insights: disabled
See the Insights guide for the full picture and the Configuration Reference for the field details.
Upgrading from @hostess/nextjs 0.1.x? The server hooks moved to the /server subpath in 0.2.0 — change from "@hostess/nextjs" to from "@hostess/nextjs/server" in instrumentation.ts. The package root now exports only client components.
Web Analytics & Speed Insights
The same package also provides browser-side insights: privacy-friendly audience analytics (visitors, page views, referrers, countries, devices) and real-user Core Web Vitals with a Real Experience Score. Add the components to your root layout:
import { Analytics, SpeedInsights } from "@hostess/nextjs";

export default function RootLayout({ children }: { children: React.ReactNode }) {
  return (
    <html lang="en">
      <body>
        {children}
        <Analytics />
        <SpeedInsights />
      </body>
    </html>
  );
}
Data appears on the service's Analytics and Speed Insights tabs in Studio. No cookies, no third-party scripts, nothing sent in development. See Web Analytics for what's collected and how visitors are counted.
Custom Domains
Custom domains let you serve your Next.js application from a branded URL like myapp.com instead of the auto-generated *.hostess.run address.
services:
  frontend:
    type: nextjs
    build:
      source: ./frontend
    domains:
      - myapp.com
      - www.myapp.com
After deploying, configure DNS for each domain using the target shown by Hostess. Hostess automatically provisions TLS certificates for your custom domains via Let's Encrypt. See Custom Domains for the full setup guide.
Replicas and Autoscaling
For production Next.js applications that receive significant traffic, configure multiple replicas or autoscaling to handle load:
services:
  frontend:
    type: nextjs
    build:
      source: ./frontend
    replicas: 3
resources: mediumservices:
frontend:
type: nextjs
build:
source: ./frontend
replicas:
min: 2
max: 20
target_cpu: 70
resources: mediumRecommendations
- Small projects and staging — 1 replica with
smallormediumresources is sufficient. - Production applications — Start with
min: 2for redundancy. Two replicas ensure your application stays available even if one instance is being redeployed or restarted. - High-traffic applications — Use autoscaling with
min: 2and amaxbased on your expected peak traffic. Thetarget_cpu: 70default works well for most Next.js applications. - SSR-heavy applications — If your application does extensive server-side rendering, consider
largeresources for more CPU and memory per replica.
Health Checks
By default, Hostess checks GET / on port 3000 to determine if your Next.js application is healthy. This works for most applications because Next.js always serves the home page.
If you have a dedicated health check endpoint, you can override the default:
services:
  frontend:
    type: nextjs
    build:
      source: ./frontend
    health:
      http: /api/health
      interval: 15s
      timeout: 3s
      retries: 3
You might create a custom health check endpoint in your Next.js API routes:
import { NextResponse } from 'next/server';

export async function GET() {
  return NextResponse.json({ status: 'ok', timestamp: new Date().toISOString() });
}
Lifecycle Hooks
Next.js applications can use lifecycle hooks for tasks like static file collection, cache warming, or cleanup:
services:
  frontend:
    type: nextjs
    build:
      source: ./frontend
    lifecycle:
      post_deploy:
        command: ["node", "scripts/warm-cache.js"]
        on_failure: continue

      shutdown:
        timeout: 30s
Complete Examples
Minimal Next.js Application
version: "1.0"

services:
  app:
    type: nextjs
    build:
      source: .
    domains:
      - myapp.com
Next.js with FastAPI Backend
version: "1.0"
name: my-saas

services:
  frontend:
    type: nextjs
    build:
      source: ./frontend
    env:
      API_URL: ${api.url}
    depends_on:
      - api
    replicas:
      min: 2
      max: 10
    domains:
      - app.mysaas.com

  api:
    type: fastapi
    build:
      source: ./backend
    env:
      DATABASE_URL: ${database.url}
      REDIS_URL: ${cache.url}
      JWT_SECRET: ${secret:JWT_SECRET}
    depends_on:
      - database
      - cache
    domains:
      - api.mysaas.com

  database:
    type: postgres
    resources: large

  cache:
    type: redis
    resources: small
Next.js with Custom Build Configuration
version: "1.0"
name: custom-nextjs

services:
  frontend:
    type: nextjs
    build:
      source: ./frontend
      dockerfile: Dockerfile.prod
      args:
        NODE_ENV: production
        NEXT_PUBLIC_SENTRY_DSN: https://public@sentry.example/1
    env:
      API_URL: ${api.url}
      SENTRY_AUTH_TOKEN: ${secret:SENTRY_AUTH_TOKEN}
    depends_on:
      - api
    resources: large
    replicas:
      min: 3
      max: 25
      target_cpu: 60
    health:
      http: /api/health
      interval: 10s
    domains:
      - myapp.com
      - www.myapp.com
${secret:...} references are not resolved in build.args. Only literal string values are passed as Docker build arguments. Put secrets in env when they must be available at application runtime.